LAST UPDATED September 2, 2021
Let’s talk about the future of application security. For those of us who have been designing network and application security architectures in the past couple decades it’s been impossible to notice the pace of change has accelerated in the last few years. Static, legacy architectures are giving way to dynamic, auto-scaled microservices architectures. But can we continue to secure applications developed with CI/CD pipelines using legacy approaches?
Not without losing the benefits that microservices and CI/CD bring to the table. Traditionally, application security architects and operators have been siloed from the application developers and this has created bottlenecks. When business requirements and security come into conflict we find that security is often sacrificed.
Now that microservices architectures, with all of the benefits they bring, are becoming mainstream, SecOps and DevOps are becoming more and more integrated. This is definitely a trend I can get behind!
But the bulk of application security solutions are still stuck in the dark ages, using bloated appliance or virtual appliance-based approaches that can’t automatically scale up and down with the application and don’t support automated deployments that are already built into the DevOps toolbox.
You don’t deploy pet web servers on dedicated hardware blades or appliances anymore. Why would you deploy your WAF that way?
In microservices architectures you don’t deploy pet web servers on dedicated hardware blades or appliances anymore. Why would you deploy your WAF that way? This is an approach that causes friction with DevOps. Instead, we need to treat the application security layer as just another web service that can be layered on to the microservices fabric. For infinite scale, you want to tightly couple the deployment of security with your app.
This is not possible with legacy solutions, so what are the requirements for this type of design? To meet the demands of the modern microservices architecture, application security must:
- Be tightly coupled with the application so it can automatically scale up and down with the application, enabling infinite scale. Though, it must not be too tightly coupled with the application service that security rule and intel updates bring the application service down. (e.g. plugin modules to nginx/apache/etc.). We’ll discuss this design below.
- Be lightweight to allow linear scale. The security solution must be a microservice itself, dedicated to its task without extraneous capabilities that use up precious CPU and RAM resources. At ThreatX, for example, our sensors are dedicated to application security and don’t have extra bloat for client-side security functions.
- Be extremely performant, just like the application service layer. With containers, the services can have bare-metal access to the CPU and RAM, just like other processes on the node or host. At ThreatX, we develop our light-weight sensors in Rust for the highest sub-millisecond performance.
- Be cost effective as the application scales. You can’t automatically scale if you need to worry about licensing new instances. At ThreatX, we don’t charge by the sensor, so you can auto scale up and down as you please.
- Protect both the front-end and back-end services, even with service mesh architectures. Protecting east/west traffic is ever-more difficult in a microservices architecture, but by integrating the security component with both the front-end app and the back-end APIs, you get automatic full coverage at scale. Even with service mesh and overlay networks! (We’ll demonstrate this design below)
- Be centrally managed and ephemeral so the security layer is not a pet, but cattle, just like the web services. At ThreatX, all sensor configuration is stored centrally, sensors pull their configuration on startup, and are automatically updated without service disruption as we push new intelligence and behavior rules to the sensor.
- Support a robust API for tight integration with the SOC IR workflow, as well as the DevOps CI/CD pipeline. At ThreatX, all configuration and maintenance can be performed through our documented API.
- Be adaptive to your changing applications so your security can keep up with your agile development cycles and not leave your site exposed in a non-blocking state while tuning the signatures. ThreatX sensors are constantly profiling the applications they are protecting to adjust behavior rules. As a result, 100% of our customers are in blocking mode, which is unheard of in the legacy WAF space.
So now that we have our requirements for a modern application security architecture, how can we put this into practice?
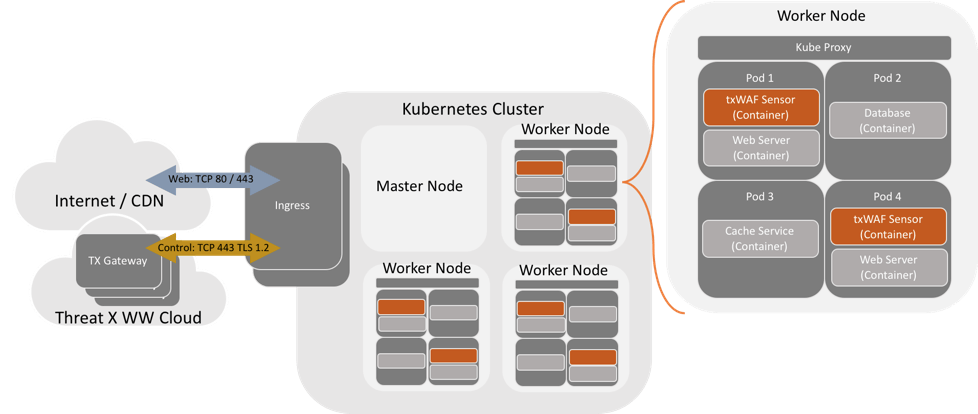
I’ll illustrate this using a simple Kubernetes deployment, though any container orchestration framework can be adapted to this approach. One of the interesting networking features of Kubernetes is that the atomic unit of a microservice, which is called a Pod, can contain one or more containers and all of the containers within a Pod share the same network namespace. This means that all containers in a Pod can communicate with each other over localhost! This is exciting because it makes it very simple to tightly couple security with your application by deploying a sidecar container within the pod.
In the design’s simplest form, you would deploy a Pod with two containers: nginx (for your app) and a ThreatX sensor container to secure it. The nginx container would be configured to listen on localhost on some non-standard port, like 8080. The ThreatX sensor container is configured to listen on port 80 and has a back-end configuration of localhost:8080 to send the scrubbed traffic to the application container. Voila – your application is now secured at scale! The same approach works for back-end services that host a restful API, so you can protect your east/west traffic, too – no matter what service mesh (if any) you choose to use.
Microservices sidecar container design using Kubernetes
Sounds good, right? Let’s see if it works with a simple Kubernetes setup. Minikube is an easy way to get up and running and can be used to follow along below if you don’t already have a Kubernetes environment to play around in. (Minikube setup and understanding Kubernetes basics such as Pods, Deployments, and Services is beyond the scope of this post, but even a newbie should be able to follow along.)
First, let’s set up a simple Kubernetes Deployment. Here’s our protected-nginx.yaml file:
|
apiVersion: extensions/v1beta1
kind: Deployment
metadata:
name: protected-nginx
spec:
replicas: 3
template:
metadata:
labels:
app: threatx-nginx
spec:
containers:
– name: nginx
image: bitnami/nginx
– name: txwaf
image: threatx/txwaf
ports:
– containerPort: 80
env:
– name: CUSTOMER
value: “lab”
– name: API_KEY
value: “1234567890abcdef1234567890abcdef1234567890abcdef12345678”
|
In this Deployment we are spinning up three replicas of a Pod that will be running the bitnami/ nginx container and the threatx/txwaf container. I’m using the Bitnami nginx image from Docker Hub since it is configured to listen on port 8080 in contrast to the official Nginx repo image which listens on port 80. We need nginx and the ThreatX sensor to listen on different ports in the Pod so there aren’t conflicts. In production you would customize your web server container to listen on any non-standard port and bind only to localhost for the best security.
The ThreatX sensor is ephemeral and doesn’t require any configuration other than the customer name and API key environment variables. This allows you to treat the sensors like cattle instead of like pets, which is a modern way of managing and scaling containers. The rest of the sensor configuration is done through the ThreatX web UI, CLI, or API. In this case I set up an application within ThreatX called kellykube.mytest.com with a back-end of localhost:8080. I’ll add a hosts file entry for kellykube.mytest.com when we expose the service in Kubernetes.
First let’s spin up our deployment:
|
$ kubectl create -f protected-nginx.yaml
deployment.extensions/protected-nginx created
$ kubectl get deployment
NAME DESIRED CURRENT UP-TO-DATE AVAILABLE AGE
protected-nginx 3 3 3 3 39s
|
Now let’s expose the deployment as a service so we can reach the nginx welcome page from the outside world:
|
$ kubectl expose deployment protected-nginx –type=NodePort
service “protected-nginx” exposed
$ kubectl get service
NAME TYPE CLUSTER-IP EXTERNAL-IP PORT(S) AGE
kubernetes ClusterIP 10.96.0.1
protected-nginx NodePort 10.105.81.200
|
To keep things simple, I used the NodePort method which exposes the service on a random port on the node, which is shown above as 30070. Using minikube you can find the exposed IP address using the minikube service protected-nginx —url command. Now I can add the /etc/hosts file entry on my laptop to test access to the nginx service:
| $ echo “12.34.56.78 kellykube.mytest.com” | sudo tee -a /etc/hosts |
We can now test access to the nginx service, which should be load balanced across the three pods by going to http://kellykube.mytest.com:30070/.
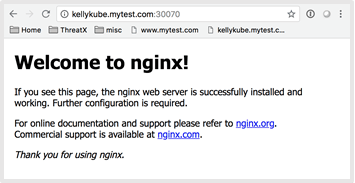
Excellent! We have connectivity to the back-end application through the ThreatX WAF sensor. Let’s hit the site a few times to make sure the requests are being balanced across the three pods:
| $ for i in {1..15};do curl http://kellykube.mytest.com:30070/ > /dev/null;done |
Now let’s check the nginx access logs to see if the requests have hit all of the Pods:
|
$ kubectl logs protected-nginx-764675b966-72zbc nginx
127.0.0.1 – – [05/Aug/2018:23:50:02 +0000] “GET / HTTP/1.1” 200 612 “-” “curl/7.54.0”
127.0.0.1 – – [05/Aug/2018:23:50:02 +0000] “GET / HTTP/1.1” 200 612 “-” “curl/7.54.0”
127.0.0.1 – – [05/Aug/2018:23:50:03 +0000] “GET / HTTP/1.1” 200 612 “-” “curl/7.54.0”
$ kubectl logs protected-nginx-764675b966-7qk6h nginx
127.0.0.1 – – [05/Aug/2018:23:50:02 +0000] “GET / HTTP/1.1” 200 612 “-” “curl/7.54.0”
127.0.0.1 – – [05/Aug/2018:23:50:02 +0000] “GET / HTTP/1.1” 200 612 “-” “curl/7.54.0”
127.0.0.1 – – [05/Aug/2018:23:50:02 +0000] “GET / HTTP/1.1” 200 612 “-” “curl/7.54.0”
$ kubectl logs protected-nginx-764675b966-gpknt nginx
127.0.0.1 – – [05/Aug/2018:23:50:02 +0000] “GET / HTTP/1.1” 200 612 “-” “curl/7.54.0”
127.0.0.1 – – [05/Aug/2018:23:50:03 +0000] “GET / HTTP/1.1” 200 612 “-” “curl/7.54.0”
127.0.0.1 – – [05/Aug/2018:23:50:03 +0000] “GET / HTTP/1.1” 200 612 “-” “curl/7.54.0”
|
Good stuff – so now that we have our protected application running on three pods, lets scale it up to 6 pods. This can be done in an automated fashion, but we’ll scale the deployment up manually here. The key thing to remember here is that we are scaling security and the app together just by scaling the app.
The key thing to remember here is that we are scaling security and the app together just by scaling the app.
|
$ kubectl scale deployments/protected-nginx –replicas=6
deployment.extensions “protected-nginx” scaled
$ kubectl get deployments
NAME DESIRED CURRENT UP-TO-DATE AVAILABLE AGE
protected-nginx 6 6 6 6 49m
|
That was easy! Of course, in a production environment these pods would be spread across many nodes to provide high-availability and increased performance.
Let’s view the application in the ThreatX Dashboard UI to see if there is any suspicious activity to the application:
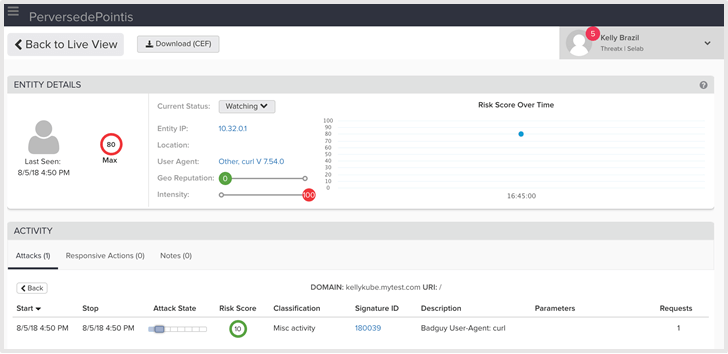
Here we see that ThreatX is tracking my activity and elevated my risk level since I was running some high-intensity scripted requests against the site using curl.
In conclusion, by using microservices architectures and tightly coupling application security with the application we can become part of the CI/CD pipeline. This makes your DevOps team happy and allows infinite auto-scaling, providing application security for public facing apps and internal services, such as REST APIs.